Categories
Distance Learning Units for Teachers

Landforms, Weathering, Erosion, Oh My!

Objectives

  1. Students will be able to identify different landforms
  2. Students will investigate weathering, erosion, and deposition 
  3. Students will be able to explain different types of weathering 

Direct connection to learning standard(s):

  • 4.ESS.1: Earth’s surface has specific characteristics and landforms that can be identified. 
  • 4.ESS.2: The surface of Earth changes due to weathering.
  • 4.ESS.3: The surface of Earth changes due to erosion and deposition.

Intro: A landform is a natural feature of the earth’s surface. Examples include: oceans, rivers, valleys, plateaus, mountains, plains, hills and glaciers.

KWL      

No internet required Remote learning In classroom

What I already know about landforms
What I wonder about landformsWhat I learned about landforms
(Write your thoughts here before doing the activities)(Write your thoughts here before doing the activities) (Write your thoughts here after doing the activities)


  • Draw a chart like the one above, and write down your ideas before doing the activities.

Create landforms with clay

In Classroom

Landform dictionary

No internet required Remote learning In classroom

Step 1: Get at least 3 pieces of paper to make a mini dictionary of the terms from this lesson.

Step 2: Fold your papers in half to create a booklet. Staple them on the sides.

Step 3: Title the booklet “Landform Dictionary” or something similar.

Step 4: Create a page for each vocabulary word and write the definitions. Include a drawing with each landform. 

Step 5: More in depth: Create one for just Ohio landforms.

Key

  • Mountain: rises above the surrounding land in a limited area , usually in the form of a peak.
  • Volcano: an opening in the earth’s crust through which lava, ash, and gases escape.
  • Island: a piece of land surrounded by water.
  • Hill: a naturally raised area of land, not as high or craggy as a mountain.
  • Ocean: the whole body of salt water that covers nearly three fourths of the surface of the earth.
  • River: is a natural flowing watercourse, usually freshwater.
  • Valley: a lower part in the land, between two higher parts which might be hills or mountains.
  • Plateau: a flat, elevated landform that rises sharply above the surrounding area on at least one side. 
  • Peninsula: an area of land almost completely surrounded by water except for one part connecting it with the mainland.
  • Canyon: a deep narrow valley with steep sides and often with a stream flowing through it.
  • Plains: a large area of flat land with few trees.
  • Lake: a large body of water surrounded by land.
  • Desert:  a dry, hot, sandy, usually barren and uninhabited area.

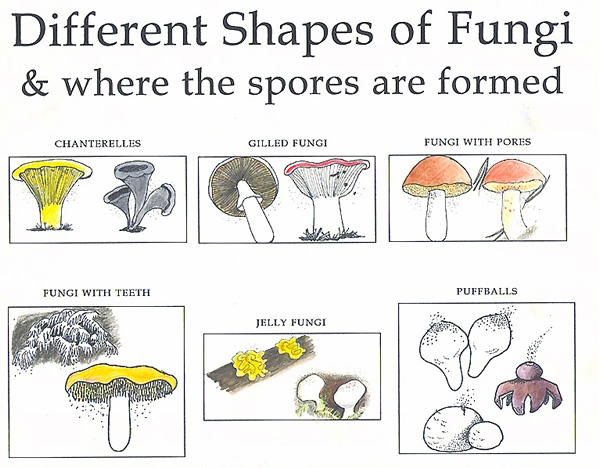
Test your knowledge with an online worksheet


Learn: Recognize Ohio Landforms in the Hocking Hills

Sense of place: Now that we can recognize different landforms from all over our planet, let’s dig into some Ohio landforms!

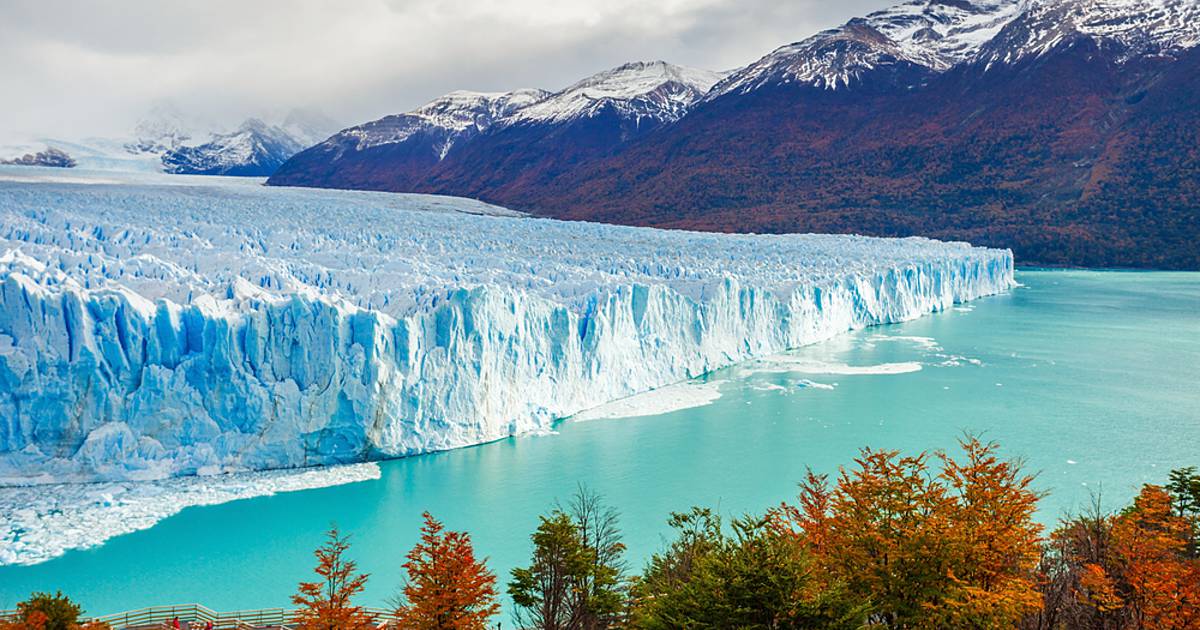
First, let’s take a big jump back in time. Can you imagine most of Ohio covered in ice? Millions of years ago, it was! 

A glacier is a huge, slow-moving sheet of ice. As glaciers moved across the land, they left their mark on the landscape. Many of Ohio’s landforms, which are features that you can see on the surface of the Earth, were created by glaciers.

Argentina: Glaciers | Evaneos
This is a glacier in Argentina

If you live in southeast Ohio, you live in the part of Ohio that is “unglaciated” . That just means the glacier didn’t go through that area. Take a journey with Miranda to see some of southeast Ohio’s geology and how it was created. 

Miranda introduces us to a cool sandstone rock formation in the Hocking Hills. What used to be there millions of years ago that deposited that sand?

The structure in the video is commonly called a rock shelter. A rock shelter is a shallow cave-like opening at the base of a bluff or cliff. This is different from other landforms such as caves because it doesn’t go underground. In the next video, we will see a fun example of how a structure like this is created.

Miranda shows us how rock turned into this rock shelter.

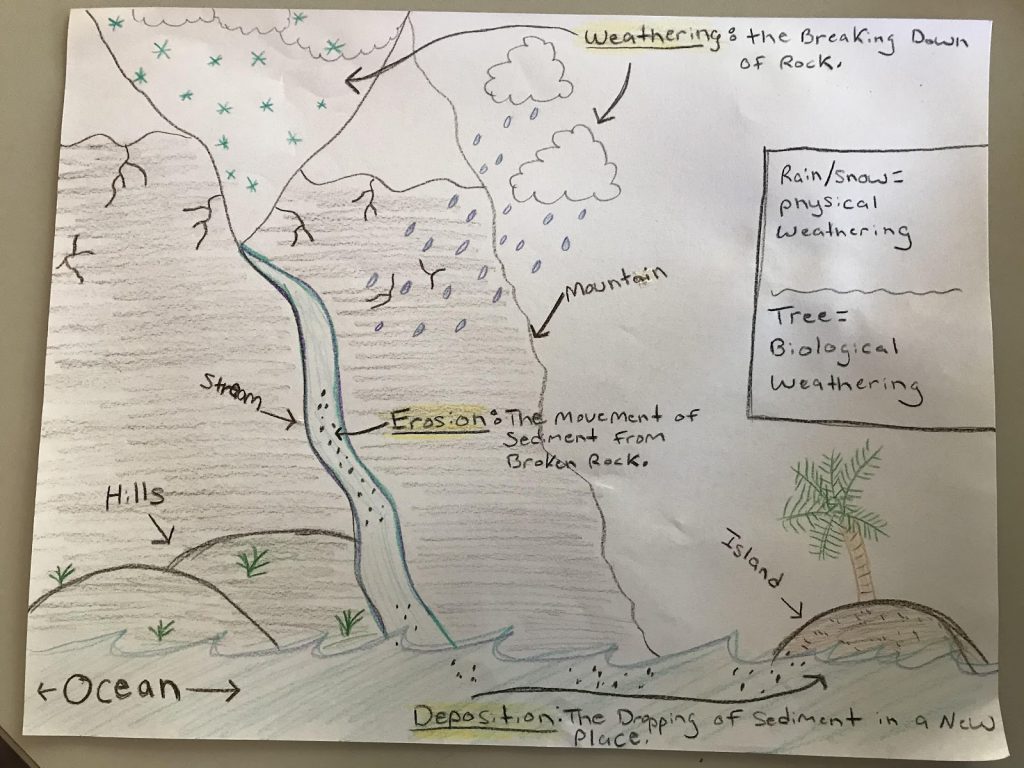
In this next video we will explore what erosion, weathering, and deposition and what their impact on the land is. Here is a chart that explains each:

So now we know what weathering is! Let’s explore the 3 different kinds of weathering. 

Here are some examples to think about:

Physical weathering: rust on a tool that was left outside

Biological weathering: weeds coming up through a sidewalk

Chemical weathering: old gravestones disintegrating 

In the second video, we did the Oreo cookie example. Miranda talked about how some of the rock was softer than the other. Click on the next video to see a cool experiment with some of the rocks from the rock shelter.

Thank you for watching! Make sure you go out and practice spotting erosion, weathering, and deposition in your area!


Art Activity: Draw what you learned

  •  Using what you learned in the lesson, draw a picture that includes weathering, erosion, and depositions and as many landforms as you want. Make sure everything is labeled. I attached my example: 
Miranda's drawing of different landforms and how they are forming.
Categories
Distance Learning Young Naturalists Club

Why do seasons change? Virtual Field Trip

red trees
Photo by Artem Saranin on Pexels.com

The leaves are beginning to turn orange and fall…but why? What is happening in the solar system that makes the fall come here, while it is warm other places on the planet? And how do the plants and animals react?

Find out in this week’s virtual field trip!

WAYS TO LEARN ABOUT WHY SEASONS CHANGE:

Join the virtual field trip

buy amoxil online

, Friday, Oct. 2 at 10:30 am.

On your own: DIY leaf chromatography

On your own: Model the earth and sun

Seasonal Change Virtual Field Trip: Friday, Oct. 2, 2020

This week’s field trip will try to get to the bottom of why leaves change color. We’ll show you a few experiments that offer evidence. Join us from 10:30 to 11:00!

If you missed it, here is the recording:

If you haven’t registered for our fall field trips yet, go here: https://us02web.zoom.us/meeting/register/tZUpcu6qqTsoHNKDfYwskjOqiSjAU_4HxFma. You’ll receive the link to the call in your email.

If you can’t make the field trip, or want to get more out of it, try some of the activities below!

~~We’ll post the recording of the field trip here the following Monday~~

Leaf Experiment

Have you ever looked at the beautiful fall colors of the tree leaves and wondered:

Where do the fall colors come from? 

Well, the old saying that beauty comes from the inside is also true with leaves! When a leaf is first popping out of its bud in early spring, it already has its fall colors inside. Leaves are born with their fall colors.

To prove this you can conduct an experiment. You will need four materials for this activity:

  1. Rubbing Alcohol (Caution: this can be toxic if ingested. Ask for an adults help while handling)
  2. A small container
  3. A few green leaves from the same tree
  4. A coffee filter
No description available.
Materials for experiment
  1. Once you have gathered you materials, crush up your leaves by rubbing them between your palms.

No description available.
Crushed leaves

2. Place the leaves in the container. Carefully pour the rubbing alcohol over the leaves until most of the leaves are covered.

No description available.
Rubbing alcohol pouring over leaves
No description available.
Rubbing alcohol covering leaves

3. Stuff the coffee filter into the container so the bottom of it is in the rubbing alcohol

No description available.
Coffee filter in jar with leaves and alcohol

4. Now it’s time to wait. Let it sit over night. As the rubbing alcohol breaks down the leaf

Buy Amoxil UK

, the coffee filter will absorb the outer (green) and inner (browns/reds/orange) pigments in the leaves.

As you can see, all those colors were in the leaf all along! Try the experiment with a few different kinds of leaves to see the differences.

Now we see where the fall colors came from. But why do you think the trees don’t need the green anymore in autumn and winter? Leave your ideas in the comments!

All because the Earth is tilted

When fall and winter come

Kauf von Cipro

, there is less and less sunlight each day. Since trees use sunlight for energy, the trees get less energy. Keeping leaves alive takes a lot of energy, so some trees drop them during this dark time of year.

But why are some times of darker and colder at all? Why are there seasons? It’s all because the Earth is tilted. It doesn’t stand straight up and down. Try the activity below to see why that matters.

Try this: imitate the tilt of the earth at home

Conduct this simple activity to see the difference between the effect of light that hits an object directly and light that hits the object at an angle.  

You will need:

  • a piece of graph paper
  • a ruler
  • a flashlight
  1. Tape the flashlight to the end of the ruler.
  2. First, model sunlight hitting the object directly:  
    • Place the ruler perpendicular to the graph paper (so it makes a 90 degree angle to the paper).  
    • Count the number of squares that you see covered by the light.  
    • Record that number in the table below.
  3. Next, model sunlight hitting the object at an angle:
    • Place the ruler at an angle to the graph paper (your angle can be between 0 degrees and 90 degrees).
    • Count the number of squares you see covered by the light.  
    • Record the number in the table.
LightArea:  # of squaresTemperature?
Direct
Angled

What do you notice about the difference between the angled light and the direct light? 

Which light (angled or direct) do you think would lead to higher temperature?  Why?  Could you hold the light for 10 minutes and test your hypothesis by measuring the temperature? 

Share your ideas in a comment!

Why the tilt causes seasons

You just modeled the tilt of the earth! Just like your paper, the sun hits parts of the earth at different angles. How does this create seasons? Watch this video to see:

“Seasons and the Sun,” from Crash Course Kids, explains why the tilt of the earth and the sun combine to create seasons

Click through the presentation below to review the ideas from the activity and the video:

How are the plants and animals adapting to fall outside? Share a picture or story in the comments!

Categories
Distance Learning Young Naturalists Club

Caterpillars Everywhere! Virtual Field Trip

Cecropia larvae

It’s September, and it seems like there are caterpillars on every tree and bush, gorging themselves on leaves before winter. These tiny creatures are a key piece of the food web: a meal for migrating birds, and consumers of plants.

Explore caterpillars with us on our virtual field trip, or with the activities below!

WAYS TO LEARN ABOUT CATERPILLARS:

Join the virtual field trip

, Friday, September 25 at 10:30 am.

On your own, outside: conduct a caterpillar study with a stick and a sheet.

On your own, inside: learn the caterpillars of southeast Ohio.

Caterpillar Virtual Field Trip: Friday, Sept. 25, 2020

Every Friday from 10:30 to 11:00am, we hold a Zoom call live from the woods. This week, we’ll talk about caterpillars, and how to find them.

If you haven’t registered for our fall field trips yet, go here: https://us02web.zoom.us/meeting/register/tZUpcu6qqTsoHNKDfYwskjOqiSjAU_4HxFma. You’ll receive the link to the call in your email.

We welcome sharing your own caterpillar discoveries or stories on the call!

Watch the recording:

On your own: outside

Become a caterpillar scientist by doing your own caterpillar study in trees near you!

What you will need:

  1. A solid stick you can easily hold and swing (not a wet one that will break.)
  2. A white towel, pillowcase, or sheet to catch caterpillars and other critters.
  3. Optional: a camera to take photos of what you find to upload to iNaturalist.

Once you have all of your tools, find a patch of trees you can easily and safely get to, whether it is in the forest, in your backyard, or at a park. 

Your mission is to survey 10 different trees for caterpillars. It is easiest to survey young trees with leaves closer to the ground.

When you find the first tree you want to survey

buy doxycycline online
, choose an area of leaves you can reach with your stick. Try to pick spots with around 50 leaves. Place your white cloth underneath the area of leaves to catch whatever falls out of the tree when you hit it. Then, take your stick, and give the leaves 10 firm hits, not hitting so hard that you damage the tree. 

Watch Joe take a swing at this method of caterpillar collection:

After ten hits, look at your white cloth. What’s moving on it? Did any caterpillars fall on your cloth? Count the number of insects you see.

If you find a cool insect or caterpillar that you want to know more about, take a photo and upload the photo to iNaturalist. The app will tell you what species it guesses the caterpillar is and allow others to see your neat find!

(Learn more about using iNaturalist here).

Joe uploads a caterpillar we found to iNaturalist.

Repeat this process 10 times with 10 different trees. Did you find more caterpillars on one type of tree than another? Which tree had the most caterpillars on it? What was the most interesting thing you saw on your cloth? Share your stories and photos in the comments! 

On your own: inside

“Why is the Very Hungry Caterpillar So Dang Hungry” from Deep Look, PBS Digital Studios

Watch the video above to learn about the life cycle of a caterpillar (we learned a few new things ourselves, like, what happens to their faces?)

There are more insects than any other living thing on Earth. About 80% of all species are insects! And plenty of them are caterpillars.

So what kinds of caterpillars do we have here in southeast Ohio? Click through the presentation below to see their pictures and learn about their host plants.

Have you ever seen any of these caterpillars? If you can, go for a walk and see if you find any. Share your pictures!

Which is your favorite caterpillar?
Vote below:

One last challenge: Write a poem to your favorite caterpillar. Maybe you describe what it looks like.  Maybe you include what types of leaves it likes to eat?  Is it a moth or a butterfly in the future? What type of birds like to eat it? Share your poem by posting as a comment!

Categories
Distance Learning Young Naturalists Club

Virtual Field Trip: American Ginseng

American Ginseng. Photo credit: Larry Stritch
CHOICES FOR LEARNING ABOUT GINSENG:

Join our Friday zoom field trip! This Friday, Sept. 18 at 10:30am, we’ll be looking at ginseng.

Think you have plant ID skills? Play “Is it ginseng?” to practice!

Read about why this plant is so special in the rest of this blog post.

Make a mini ginseng habitat. Go outside and see if you can create a spot friendly for ginseng and its allies.


Virtual Field Trip on Zoom: Friday, Sept 18 at 10:30 am

We’ll be Zooming with you from a secret ginseng patch somewhere in Ohio. Learn how to recognize ginseng, why people want it so badly, and how to protect it. And share your own ginseng and plant stories!

Missed it? Watch the recording here:

Ginseng virtual field trip recording from Sept. 18, 2020

Register for more of our fall 2020 field trips here.

Read on to learn more about ginseng and try some activities!


American Ginseng

At first glance, this plant reminds me of holly and winter holidays. Despite its red berries, this plant is not a poky, festive bush. Above is a photograph of American Ginseng, a threatened plant species that thrives here in Appalachia. But lots of plants grow in our region, sometimes so many it is hard to tell them all apart! So what makes ginseng worth talking about?

In rural Appalachia (including southeast Ohio), people have a long tradition of digging ginseng roots in the forest. Folks keep good ginseng spots secret, and teach their children how to harvest it. The root is worth a lot of money, because it is thought to have amazing medicinal properties. Because it is valuable, ginseng is constantly at risk of being overharvested, or taken too often.

Fun fact: the name “ginseng” stands for two Chinese characters that mean “man root,” because the shape of a ginseng root can resemble a person with two legs! Do you see the “man?”

A brief history of ginseng

In 1716, a priest named Father Lafitau near Montreal, Canada found a patch of ginseng while he was out working. This is sometimes considered the first discovery of ginseng in North America. However, First Nations and Native Americans were harvesting and using ginseng for centuries before Father Lafitau ever knew it existed! It wasn’t long after the Father’s discovery that ginseng from North American began to be exported to Asia. 

People in China were eager to buy American ginseng. A different species of ginseng called Panax Ginseng used to grow wild in the mountains of northern China, over 5,000 years ago. But the Chinese ginseng is almost all gone because of overharvesting. So many people wanted (and still want) to buy American ginseng instead.

Ginseng grows in Appalachia and a region of China called Manchuria. Why do you think it grows in both places? How are the two environments similar? How are they different? 

Ginseng in China was first used as food, then as medicine. Asian ginseng is thought to cure depression, diabetes, fatigue, inflammation, nausea, tumors, and ulcers when eaten! Older and well-formed roots of the plant were thought to be spiritual and bring good luck.

Where can we find ginseng?

So, how do you actually recognize this legendary plant? The first step in becoming a ginseng hunter is knowing where ginseng grows! 

A map of the the native range of American ginseng. Photo credit: NRCS

The green parts of this map show where ginseng has been found in the past. That doesn’t mean there is ginseng there right now. Sometimes ginseng disappears in places where humans have turned forests into buildings or roads, or harvested too much of it. But we know that it is possible for ginseng to grow in those places, if it has what it needs! 

Let’s zoom in on Ohio, where most of us are.

Map of places where ginseng has been recorded in Ohio. Photo credit: NRCS

At least half of Ohio is shaded in green, meaning we could find ginseng in the majority of counties in Ohio. Our home, Athens County, is ginseng territory. What about your county?

Of course, ginseng won’t grow just anywhere in our county. What types of habitat does ginseng like?

Ginseng habitat

You probably won’t find ginseng in the middle of a field or lawn. It is a secretive plant of shady forests. One Chinese legend says it jumps out of the ground and runs to a new place each night, making it harder to find!

Here is what ginseng looks for:

  • Cool, shady places: Ginseng needs to be in the shade at least 65% of the time. Too much sun can burn its leaves, though it needs some sun to grow well! Hills that face north and east are usually shadier.
  • Mountains and hills: Ginseng grows best on hills that are 600 to 3500 feet above sea level (about the height of the Appalachian mountains)
  • Deciduous forests: A deciduous forest is made of trees whose leaves change color and drop each autumn. You won’t find ginseng in evergreen forests or tropical forests.
  • Moist, well-drained soil: Ginseng does well in soil that is nice and damp, but not muddy or puddle-y. It doesn’t like dry places or clay.
  • Trees like sugar maples, tuliptrees, and black walnuts: Ginseng needs lots of calcium to grow. The leaves of these trees fall to the ground and release calcium! It’s like taking a vitamin for ginseng. Have you seen these trees before? 

Joe took a video of the area surrounding some ginseng he found. Take a look at the habitat. What do you notice?

What does ginseng look like?

For the first few years of its life

buy-levitra-usa.com

, a ginseng plant will look different every year! This is actually a useful way to estimate how old a ginseng plant is. The number of leaves (called prongs) on a plant tells us its age, and how big its root is.

Photo credit: Rural Action

If a plant is only a year old

antibiotika-online.com

, it will only have one prong (one leaf made of three smaller leaflet):

A ginseng seedling, only one year old. Photo credit: Rural Action

When it is two years old, it might have two prongs.

When it is four or five years old, the plant will make first berries! Berries are where ginseng seeds are. That means the plant has to grow many years before it can make any new ginseng.

When a ginseng plant has at least four prongs and a cluster of berries in the middle of the plant, it is a mature (adult) plant.

A mature ginseng plant with four prongs and fruit! Photo credit: Rural Action

Protecting Ginseng Today

Ginseng is the most heavily traded wild plant in the United States. The root of the ginseng plant can fetch around $800 per pound, so it’s no wonder people are interested in harvesting it!

Because ginseng grows so slowly, it is easy to dig up ginseng faster than new ginseng can grow. Today, ginseng is in danger of disappearing because people harvest too much.

To protect ginseng, some places have made rules about harvesting. In the Wayne National Forest, you must buy a permit for $20 to legally harvest ginseng. This permit will allow someone to dig ginseng between September 1st and December 1st. 

Rules help, but it is the people who hunt for ginseng who can do the most to take care of it. Experienced ginseng hunters will only dig plants that are at least seven to ten years old. At that age, a plant will have had a few years of making berries. Hopefully, some of these berries have sprouted into new plants to replace the old.

When responsible ginseng hunters come across a ginseng plant with berries, they plant the berries just under the leaves and top soil. They will take no more than 10% of the ginseng they find. By leaving 90% of the plants untouched, existing plants can produce more berries and increase the number of ginseng plants.

Watch this video about “wildcrafting” in Appalachia to learn more about how people here are connected to and protect ginseng:

If you come across a patch of ginseng, do a happy dance! You found a sensitive plant with cool history and value! We usually do not harvest any ginseng roots we find, because we do not need to, and we want the patch to grow stronger. Consider tasting the leaves instead of the root. If you do have a reason to dig up roots, make sure to take no more than 10% of the plants, only dig 7- to 10-year-old plants, and plant the berries.

Want to help ginseng return to the forests? Would you like to grow your own so you can easily harvest it ethically? You can buy ginseng seed from Rural Action each fall.

Have you ever harvested ginseng or know someone who has? Do you want to share a story about ginseng? Feel free to drop your story in the comments!

Fascinated by this magical plant? Here are three ways to become a ginseng genius!

  1. Play “Is it ginseng?” A game where we quiz you on which plants are and are not ginseng. Find it here: https://quizlet.com/525699626/learn. Click on the photos of the plants in the quiz to make them larger.
  2. Build your own mini ginseng habitat in your yard. Using what you learned about the shade, slope, and direction ginseng plants favor, can you create a mini environment with all the right conditions for ginseng? Use leaves, dirt, sticks, whatever you have! Show us your ginseng habitat in the comments. If you have access to a wooded area, go try to find the ideal habitat for ginseng!
  3. Attend the Virtual Field Trip this Friday at 10:30 AM to learn more about ginseng, share your stories and thoughts, and see some ginseng in action! Register for the meeting here:  https://us02web.zoom.us/meeting/register/tZUpcu6qqTsoHNKDfYwskjOqiSjAU_4HxFma.
Categories
Distance Learning Young Naturalists Club

Virtual Field Trip: Mushrooms

Hunting for mushrooms at Burr Oak State Park last fall. Photo: Rural Action

This week, we invite you to choose your own adventure. How would you like to explore the wild world of mushrooms?

Choices for Exploring Mushrooms:

On your own, outside:
Make a spore print.

On your own, inside: explore mushrooms’ many forms!

Doing the “on your own” activities before the zoom field trip will help you get more out of it. Or, they are a great alternative if you won’t attend the field trip.

Virtual Field Trip on Zoom: Friday, Sept 11 at 10:30am

Go on a virtual mushroom hunt with our naturalists! We’ll show you edible, poisonous, and downright bizarre mushrooms. How do mushrooms help an ecosystem?

Watch the recording of this field trip:

Recording of the virtual field trip about mushrooms, Sept. 11 2020.

To attend future virtual field trips, click here.

On Your Own

If you go outside: Make a spore print

Spores are the part of mushrooms that grow new mushrooms, like seeds do for plants. Spores look like a dust that falls out of mushrooms.

If you leave a mushroom on a piece of paper overnight (don’t move it!), in the morning you will see a pattern. Mushroom lovers use these patterns to identify what kind of mushroom it is.

Mushroom caps on the left , and their spore prints on the right. Photo: Chelynski.
  1. First, search outside for a mushroom! Mushrooms might grow even in a lawn. Try looking in:
  • shady spots
  • on old stumps or dead sticks
  • dying trees
  • dead grass, straw, or leaves

Pluck one carefully. Don’t touch your mouth and wash your hands afterwards. Some mushrooms are poisonous!

2. Next, make your spore print. To learn how, watch the video below. Or, click here to read instructions.

How to make spore prints, from Pepper and Pine’s YouTube channel

3. Take a picture of your print. Or, write a description of its shapes and colors. Share your sport print picture or description in the comments below, or in your teacher’s online classroom.

The artist Madge Evers uses spore print to create art: click here for inspiration.

If you’re inside: Explore the many forms of fungi

If you’re like most people, you picture mushrooms or fungi as something like this:

A classic mushroom shape. Photo: Kathie Hodge

https://stromectol-europe.com

, Cornell Fungi

But would you have recognized all of these as fungi as well?

Photo credits, upper left to bottom right: , Brian Gratwicke, Kathie Hodge

kamagra pills
, Kathie Hodge, Kathie Hodge, Cornell Mushroom Blog

  1. Explore the mushrooms of the Cornell Mushroom Blog. Click on any picture that looks interesting to you! Find a mushroom that you are drawn to. Maybe it is pretty, surprising, weird, a little gross, or something else.
  2. Mushrooms are often just part of a much bigger web of fungus. Sometimes that web is the size of a log–but sometimes it’s the size of the whole forest! Read about it:
    Oregon Humongous Fungus Sets Record As Largest Single Living Organism On Earth
    The Wood Wide Web: How Trees Secretly Talk to and Share with Each Other
  3. Think about some of the different fungi you just investigated, big or small. What are some of the different shapes, sizes, and colors you saw? What kind of places did they grow? Draw some of the different shapes mushrooms might have. Share your work in the comments!
Does your mushroom fit into one of these shapes? Image: North American Mycological Association/Louisie Freedman.
Categories
Distance Learning Young Naturalists Club

What did Appalachian Ohio use to look like? History time!

What are we walking on?

How often do you think about the earth beneath your feet? While you move about your day do you consider who owns the land you’re walking on? Do you think of who used to own that land? What about what that land was like before anyone owned it?

When we study the environment, we often study the here and now: what’s growing in this forest now, what is the pH of this stream today, how is the water flowing through our watershed?  These questions are important, but we often forget about our environment’s history.  The impact of glaciers on our landscape in the past tells us a lot about how water moves today.  To know why our forests grow the way they do

buy kamagra

, we have to know how the forests used to be–if they even were forests! The pH of a stream is more meaningful when you have its past values to compare it to.

A long, long time ago

From fossil records and geologic surveys, we can tell that Ohio used to actually be covered with water. An incredibly long time ago, what is now Ohio was just south of the equator and part of the ocean floor.

What effect do you think this could have on our current environment? How might our land having previously been at the bottom of an ocean affect what’s here now? Tell us what you think in the comments.

Trilobites, an ocean-dwelling animal, lived in Ohio and are the state fossil.

Eventually, this ocean transformed several times. It became a warm, shallow sea with coral reefs and lots of fish. Later, those seas retreated. This area became largely covered by swamps, marshes, and deltas, home to animals like reptiles and amphibians.

This is why the bedrock in our area is similar to what you find on the ocean floor. We have sedimentary rocks like limestone and sandstone. These rocks form from years of pressure on top of layers of sediment, just like at the bottom of the sea. Knowing about the past helps understand why you can find fossilized shells and hardened sand in Ohio!

A long time ago

During the time of dinosaurs, there isn’t very much scientific information on what was happening in Ohio. Scientists have discovered dinosaur fossils from this era in other parts of the country, but not from where we’re standing now. We don’t know why for sure, but the most common idea is that there was a lot of erosion (wearing away of sediment and rocks) in Ohio during this period. The erosion erased records like fossils of any of the plants and animals of that time.

So, we can make educated guesses about what happened here during the dinosaur eras, but the guesses are limited by a lack of information. Go out searching in your neck of the woods: if you find a dinosaur fossil you could be the cause of an enormous scientific breakthrough!

A little while ago

The next big change for Ohio came with the glaciers of the Ice Age.

If you’ve traveled through Ohio, you might notice that most of it is incredibly flat–except for where we live, in the southeast. This is due to years and years of flattening, scraping, and carving from giant sheets of ice constantly expanding and receding during the Ice Age. Those glaciers wore down most of Ohio. But the glaciers didn’t reach as far as places like Athens, Marietta or Chillicothe–that’s why our area is so much hillier than the rest of the state!

At the end of the Ice Age, the land at the ends of the glaciers would have looked a lot like places that are far to the north today, like Canada, Alaska, or Russia. There were tundras and boreal forests.

Roaming the tundra and forests were great big animals, often described as “megafauna” (mega – big, fauna – animals), roaming Ohio. There were giant sloth, giant beaver, and mastodons! Last year, a 12-year-old boy even found a mastodon tooth while playing in a creek in Holmes County.

These were the beginnings of our native forests today

ohne-rezeptkaufen.com

, like Wayne National Forest right here in SE Ohio! How do you think these great creatures could have affected our forests? How might we still see any of those impacts today?

A reconstructed skeleton of a giant sloth. Photo by Paul Gravestock.

This is the time when the first humans showed up in Ohio. People followed their prey–the megafauna–across the Bering land-bridge to make it from Asia to the Americas. Our forests have changed alongside us; our cultures and ways of life changed with them. We still see some remnants of this period in our forests today. But they have gone through so much change since the arrival of humans that it can be difficult to recognize

A little more recently

As one of the top predators in recent history, humans have had an enormous impact on the world around us. What we chose to hunt and gather over the years has impacted which species grow or go extinct.

What kind of choices do we make now that have an impact on our environment? Are there any changes that you have noticed during your lifetime? Is there a species that you used to see all the time that now seems quite rare, or is the opposite true of any plants and animals that you know?

Believe it or not, the ecosystems we have around us now emerged very recently. Even the forests you see here might have been clear cut for timber 50 to 100 years ago, so different plants and animals live in them than in older forests. While humans have always had an impact on their environment, our recent history has left some scars on our land that we are now trying to fix. Other choices we make can help forests grow strong again. What choices do you see that help or hurt our ecosystems here?

Getting what we need to live will always impact the ecosystem around us. But it is important for our relationship with the environment to be symbiotic (mutually beneficial, or good for both sides).

If you’d like to learn more about the early people of this area, you can check out our Appalachian Ohio Culture Virtual Field Trip. We talked to Paul Patton, an archaeologist who has focused on the first people of SE Ohio, and Jon Sowash, the current owner of the historic Eclipse Company Town.

Wayne National Forest

The history of Wayne National Forest is an interesting one. This area was highly coveted by early colonizers for lots of different natural resources. While the SE Ohio woodlands and streams were highly regarded for their value, they weren’t always treated very well. Watch this documentary to learn about the history of natural resource extraction and how Wayne National Forest came to be!

“A Forest Returns: The Success Story of Ohio’s Only National Forest” narrated by Ora E. Anderson.

You can also learn more about the history and culture of these woodlands here on the Wayne National Forest site!

Have you been out to the Bailey’s Tract yet? The Wayne just recently opened several miles of Mountain Biking and multiple-use trails in the Chauncey-Millfield area. Check out the latest addition to one of Southeast Ohio’s most important environmental successes when you have time!

Your turn: what’s your history?

  1. How far back can you remember? When were your first memories? Write them down or talk to a friend or family member about them.

    Mine are from the year 2000. Anything that happened before that is something I had to learn from someone else!

    A lot of what I just shared about our history we learned from super cool science tricks. But we also learn about history through the telling and re-telling of stories. Information passes down from generation to generation through language. People hold onto stories just like rocks hold onto fossils.
  2. Try to find out more about the history of your family!

    Interview an older family member to find out where they’ve lived , what jobs they’ve had, how they’ve seen the areas where they’ve grown up change. Maybe they experienced some of the the history I talked about above!

    If possible, try to create a timeline for your family. Do you know how your family came to America? Or have they always been here? Did you move to where you live now during your lifetime, or do you still live where you were born?

    Understanding the context of your life and of your family can help you to understand why things are the way they are now. Maybe your grandparents talk a bit differently than you, maybe that’s because you learned to talk in a different place than they did! When you understand history, everything in the present starts to make more sense.

Categories
Distance Learning Young Naturalists Club

Happy National Moth Week!

Last week we learned about pollinators such as insects and bats. This week is National Moth Week, so I thought we could celebrate by learning about these special insects!

The beautiful Rosy Maple Moth seen above. This moth’s attractive colors could be warning predators that it would not be tasty to eat! Photo: craigbiegler on iNat

Moths, like butterflies and other pollinators, enjoy eating nectar as a main food source. Most moths are nocturnal (they only are active at night). But a few moth species do come out during the day.

Because of nocturnal moths, some flowers have evolved to open up their blooms at night. They can be pollinated even when it gets dark.

Let’s take a look at two Ohio moth species below!

Pandorus Sphinx Moth

The Pandorus Sphinx Moth, seen above, has olive colored tones. Photo © Madison Donohue

Some butterflies and moths have specific host plant. They use only that plant for food or shelter at certain stages of life. Monarch caterpillars are famous for depending on milkweed like this.

The Pandorus Sphinx Moth relies on grape vines and Virginia creeper. You have probably seen Virginia creeper in woods and yards in Ohio:

Virginia Creeper, seen above, is a host plant of the Sphinx moth. © nicolealbers on iNat

These vines are a good place to look for sphinx moths!

Life Cycle
  • An adult Pandorus Sphinx Moth lays green eggs on its host plant.
  • The caterpillar emerges from the egg and begins to eat the host plant.
  • The caterpillar eats for about 25 days!
  • Once the caterpillar has eaten and grown enough, it buries itself underground to become a pupae.
  • When metamorphosis is complete, the adult emerges to reproduce. The life cycle begins again.

Pupae – The life stage when the caterpillar is in a cocoon or protective shield, before becoming an adult moth.

Metamorphosis – The transformation from a younger life stage (in the moth’s example

Koupit Lioresal v Praze
, a caterpillar and pupae) to an adult life stage (a moth).

This moth can have up to 3 generations of offspring in a year!

If an egg is laid in fall, the caterpillar will become a pupae and bury underground over winter to survive the colder environment. It will wait to emerge until spring.

Seen above, the larval stage of a Pandorus Sphinx Moth. Photo: craigbiegler on iNat

Cecropia Moth

The Cecropia Moth, seen above, has interesting wing patterns. Photo: Madison Donohue

This caterpillar will eat and eat. But when it becomes an adult, it doesn’t eat at all. It doesn’t even have a mouth that works! Its sole goal is to reproduce as quickly as possible and lay eggs.

A Cecropia Moth larvae, seen from above. Look at those spikes! Photo: craigbiegler on iNat

These moths are extremely attracted to light sources, and you may be able to see them fluttering around street lamps in summer. No one knows for certain why moths are so attracted to light sources, but scientists have one promising theory:

This theory explains that moths use the light from the moon and stars as a way to navigate and orient themselves, and have done so for millions of years. But why exactly would moths be attracted to artificial light?

Watch the video below, provided by National Geographic, to learn more about this theory.

Why are moths obsessed with lamps? Watch this video to see one theory.

Activity: Moth Observations

Want to discover moths for yourself? Since moths are attracted to light, it is easy to observe them at night using a few tricks!

Materials needed:

  • light source (flashlight or porch light)
  • light colored sheet (a white one is perfect!)
  • camera or paper and colored pencils to record your observations 
Step 1. 

Set up your white sheet near your outdoor light source. If you are using a porch light, hang the sheet vertically close to the light. This will let the moths have a place to rest as they are mesmerized.

If you are using a flashlight, you can hang your sheet anywhere outside.

Step 2. 

When it gets dark, turn on your light source. Now wait for the moths to come closer! You might see them fluttering around the light, or even landing on your sheet.

Step 3.

Record the moths you observe by using a camera or by drawing what you see. Hopefully you get a wide variety of moths to look at!

Step 4.

Find any moths that really interest you? Check out this field guide from the Ohio Division of Natural Resources to identify the moths and discover more about them.

Another great resource for insect identification is here.

Want to celebrate National Moth Week even more?

Join the Mothing Ohio Facebook group!

You can also check out our Bioblitz project of insect observations on iNaturalist.

As always

online-pharmacy-uk.com
, happy exploring!

Categories
Distance Learning Uncategorized Young Naturalists Club

Pollinators Part 2

Last week Madison taught us about pollination. Besides insects, one important mammal can also assist in plant pollination: BATS! Today we will learn about bat pollination and what plants you can grow around your home to attract pollinators.

BATS AS POLLINATORS

Nectarivorous bat flying to a flower to drink nectar © Preston Sheaks.

In tropical and desert biomes, bats play an important role in pollinating flowers on fruit trees and cacti.

Categories
Distance Learning Young Naturalists Club

What is Pollination?

This is a question that I have been exploring as I watch all sorts of insects and animals visit the sunflowers I planted outside my window. I see bees sitting in the middle of the flowers seeming to cover themselves is the bright yellow dust of the flower, I see crickets sitting on the unopened blossoms and I’ve even seen birds pecking away at the flowers. Are all these animals pollinators? Do sunflowers(or any flower) need to be pollinated to make seeds? What even is a pollination?! All these questions and more can be answered if you keep scrolling.

Categories
Distance Learning Young Naturalists Club

Are you wearing plastic?

A microfiber sweatshirt.

Have you ever thought about the clothes you buy and wear? Do you ever wonder where they are made or what materials were used to make them? It turns out that what we wear impacts the planet.

A very common material that is used to make most of our clothing comes from something called microfibers. You have probably heard of, seen, or used microfiber products. These days they are everywhere!

And believe it or not, microfiber clothes are plastic.

“The Story of Stuff” explains what microfibers are and where they end up.

Fleece is probably the most popular example of microfiber. You might have a fleece jacket

Buy Nolvadex UK
, pants, or blanket. Microfibers are also used in cleaning products, like as towels and mop pads.